Hello! My name is Ruth and I blog over at My Little Nest. I’m a stay at home Mama to two little girls and wife to Manny. I love sharing my style and the occasional DIY at my blog so make sure you stop by!
Monica is on vacation for a few weeks and asked me to guest post so I thought I would share a little DIY with you all!

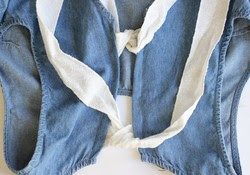
I actually got this idea from a few dresses and tops that I’ve been eyeing that have the most adorable bows not on the front but on the back. I decided I wanted to add two bows and make this little denim dress a little more fun. This already had buttons and a cut out so it made this much easier to do. You could do this with any type of dress, but you would need to cut and stitch the waist of the dress and basically make a cut out of your own. Totally possible, but I will not be going into how to make a cut out here. Although I totally could do a tutorial on that on my blog at a later time if that would interest you! (let me know in the comments!)

I picked up ribbon at JoAnn Fabrics for $4. I unbuttoned the back, folded it under on each side so I could hide the buttons and previous stitching from being seen. I also needed to create more of a gap in between the fabric so the bows would have room to tie.


After pinning both sides I cut the ribbon. I wanted my bows to be a bit longer and larger so I measured and cut appropriately. To make sure you have enough length for your bows tie a bow using one end of the ribbon. Adjust the loops in the bow until you get them the size you are looking for and cut the end. Untie the bow so you have one long ribbon. Each end will be sewn onto the dress.

Pin each end of the ribbon on the underside where your new stitch will be. This will hide the ribbon end so no one can see it. Make sure to line up the ribbon ends that are across from each other or your bows will line up crooked when you tie them. I used a measuring tape to make sure they were level and lined up at the same spot on each side. (see below) Also, keep in mind to have one side of the ribbon an inch or two longer so after tying a bow the ribbon ends are the same length.
This sounds kind of confusing but take a look at the pictures and hopefully you’ll see what I mean.
This sounds kind of confusing but take a look at the pictures and hopefully you’ll see what I mean.

Once you have them pinned you’re ready to go! Just a simple straight stitch all the way down each side. Remember to pull out your pins as you go, stay slow and steady and guide the stitch as you sew over the ribbon!


You can then take the buttons off, trim the ends and you’re officialy done!


Total cost for this was $8. I found this dress second hand and it was 50% off all clothing so only $4 for the dress and $4 for the ribbon from JoAnn Fabrics.
I hope this gives you some inspiration to try a little fashion DIY for yourself! You never know how a cute little bow can change a whole look! Thanks for reading and make sure to stop by My Little Nest! I always love “meeting” new people!
I hope this gives you some inspiration to try a little fashion DIY for yourself! You never know how a cute little bow can change a whole look! Thanks for reading and make sure to stop by My Little Nest! I always love “meeting” new people!


Thanks so much Monica for letting me guest post today!
http://www.mylittlenest.org
Wow, what a great job! I love the ribbon and bows as it does make it so much more special. I don't know how to sew, but appreciate the talent when I see it.
jess xx
http://www.elegantlydressedandstylish.com